Thursday, September 29, 2016

Winstonia Image Plate Bundle - Set 9 for Halloween


Hello, beauties!

Fall has arrived, which means Halloween is right around the corner. Today, I wanted to share some Halloween plates and a bit of art. 


First, check out the plates, with all their cute and creepy images. You want spiders? Witches? Vampires? You've got them all in this set, which includes 3 plates: Spooktacular, Horror Night, and Hallo-scream. All the plates are beautifully etched, and deep enough that they work perfectly, even with regular polish! 


All my manis started with a base of LeChat Perfect Match in Midnight Velvet, and Pinky Petals chrome mirror powders. If you missed my post about the nail powders, you can find it here. To stamp, I used Funky Fingers in Black Knight and Gesso, and Mundo de Uñas purple. The deep etching made it easier to use the regular polish; I kept smearing the stamping polish. I should have allowed a few seconds of drying time, but I liked how they turned out. 


These plates are just lots of fun and there are images to suit my ever-changing moods. My nails can be cute or crazy...you know, like me! 😉


If you'd like to check out these plates, you can find them here. 

Thanks for stopping by!


Friday, September 23, 2016

Pinky Petals Chrome Mirror Nail Powder Kit


Hello, beauties!

I've got something a little different to share today. I recently had the opportunity to try Pinky Petals Chrome Mirror Nail Powder Kit. 


I'd been seeing these chrome manis around, but wasn't sure I'd be able to accomplish the look. I think I managed, with some trial and error. I looked around and found some helpful tips from the kind and lovely Kim, over at Ten Little Canvases. Checking out her blog post and video sooner would have prevented most of my mistakes, but better late than never, right? Anyhow, I like how they turned out, and my nails have been on constant bling since the moment these powders arrived. 


This kit comes with a total of twelve different mirror powders in cute little pots labeled with numbers. It includes double-ended sponge applicators like the ones included in an eyeshadow palette. It also includes a cute, framed chart of samples showing each powder's effect. 


To use these powders, you'll need your gel base coat, your choice of polish (any color you like, but black gives the most colorful and dramatic effect; I used LeChat Perfect Match in Black Velvet), a no-wipe gel top coat, your choice of applicator, and a brush to sweep away excess powder. After your polish, apply and cure your top coat. Lightly dip your applicator into your powder of choice, and rub it over the nail. You'll want to be thorough when rubbing, paying attention to the cuticles and edges, and a little powder goes a long way. Top coat again, cure, and voilà! I do have a couple tips and 
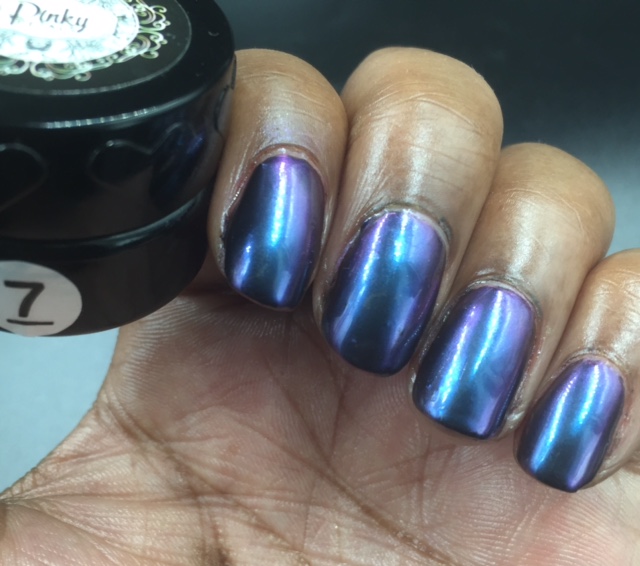
observations that may be helpful, but first, here are the swatches!


These powders are everything, and the color shifts in some of them are absolutely drool-worthy! I did note a couple things. I got a much more mirror-like finish using a silicone nail brush than the sponge applicators. Also, after several manicures, I realized that the rubbing causes the sponges to deteriorate, so I ended up with sponge bits everywhere before I realized what was happening.

 I tried using two different top coats, as well. I used Gel II and Wildflowers. I got better, shinier results using the Wildflowers. Gel II application looked more glittery, and Wildflowers had the more mirrored effect. While the sponge applicators and Gel II both worked fine, the effects of the powders shone through more using the silicone and Wildflowers. I'd compare it to the difference between scattered and linear holos...while they're both beautiful, one is more intense and eye-catching. I've also read that nails done using pigments and powders can chip rather quickly, and some people recommend an additional layer of top coat to extend wear. I just did a single coat for swatching, and so far, I'm on day 4, with no chips and minimal tip wear. I'll keep doubling the top coat in mind for manis I need to last. 


If you've stuck with me through all my rambling, thanks for reading. Also, stay tuned for some upcoming nail art with these pretties! If you'd like to know more about this fabulous mirror powder, you can find the kit here. 

Thanks for stopping by!


Saturday, September 10, 2016

Perfect Summer Gel Polish Starter Kit


Hello, beauties!

I've got another gel polish set to share. Today, it's the Perfect Summer Gel Polish Starter Kit. It includes six polishes, base and top coats, an emery board, two pots of nail charms, and a 3W handheld LED lamp. Everything you need is in the box. The colors look ordinary, at first glance, but a closer look reveals all sorts of sparkle. Like the last Perfect Summer set, these colors are identified by number. Now, on to the new pretties. 

This is 149, a juicy berry color with gold microglitter. 


150 is a warm peach with gold microglitter. 


Number 154 is silver microglitter in a blackened base. 


189 is fuchsia with blue shimmer. 


192 is baby pink with gold microglitter. 


207 is a super sheer off-white with pink shimmer. 


Each photo shows two thin coats, except 192, which required an extra coat to even out. It was like any other pink pastel, a little streaky. Some of these polishes are on the thicker side, but all are very workable, and I didn't have any problems laying down thin coats. 

I have a hard time picking a favorite from this set; I love all the bling. Overall, I think this is a great set. The polishes are unique but wearable. I'll continue to use my own LED lamp on a regular basis, but this small one is ideal for travel, or for intricate nail art that requires curing one nail at a time. 

If you like any of these colors, you can find them and much more here. 

Which color is your favorite?

Thanks for stopping by!

Monday, September 5, 2016

Elife 5-inch Length Creative Scissors


Hello, beauties!

I hope you're enjoying Labor Day. It's back to business as usual tomorrow, and my little starts high school...I can hardly believe it! I wanted to share a mani I did a while back. You may know how much I struggle with vinyls, tape, stencils...basically all things sticky. I'm still no good at them, but I found a cheaper way to practice - namely, making my own. 

I got these vinyl sheets to review not too long ago, and what better to pair them with than these scissors?


They're easy to line up...even I can do it. 


I used my handmade vinyls over an existing gel manicure. The turquoise is Azure Beauty number 32, which you can find here. The black is Funky Fingers Black Knight. 


Clearly, I need more practice, but I thought this was a cheaper way to nail the technique. It's less wasteful than printing up a whole sheet or using up my fancier ones on botched manis. These scissors come in a set of 6 different designs. With these, I'm free to experiment to my heart's content. 

Thanks for stopping by!